|
 Tue 10 Feb 2015, 14:20 Tue 10 Feb 2015, 14:20
|
Canon C300 MXF to FCP/iMovie not working? A possible fix Summary: Do you always encounter problems when you trying to import Canon C300 MXF files to Final Cut Pro or iMovie directly? In this article, you will learn the easiest way to convert C300 MXF files to FCP/iMovie/FCE native supported Apple ProRes and AIC codec for editing smoothly. With every new camera, comes many new questions about workflow. The Canon C300 can help us record vivid high-definition videos in MXF format which is often used in Sony, Panasonic and Canon high-end cameras and camcorders. The MXF format is good to record videos, but MXF files are not easy to use because many editing software and devices can't read MXF format videos, such as Apple's Final Cut Pro 6/7, Final Cut Express and iMovie. So how to solve the program when importing Canon C300 MXF footage into FCP 6/7 or other non-linear editing systems. Below, I will throw a quick guide up on how to ingest Canon C300 MXF footage into Final Cut Pro (X), iMovie and FCE for editing smoothly.  Here is the easy way to fix it, namely, converting MXF to ProRes or AIC mov on Mac. If you are interested doing likewise, check out Pavtube MXF to MOV Converter for Mac. The program is an easy-to-use and intuitive Mac tool for camcorder users. It is good at batch converting MXF recordings shot by Panasonic P2 camcorders, Sony XDCAM camcorders, Canon XF series cameras to ProRes/AIC MOV formats compatible with your Mac Video editing software like iMovie, Final Cut Pro (X), Final Cut Express, etc. Tips: If you have the same problems about editing Canon C500, XF100, XF105, XF300, XF305 MXF footage on Mac, you may view the following articles: Just free download or buy Pavtube Mac MXF Converter for Canon C300:   Step-by-step: Converting Canon C300 MXF to ProRes/AIC MOV on Mac Step-by-step: Converting Canon C300 MXF to ProRes/AIC MOV on Mac Step 1. Free download and run the best C300 MXF Converter for Mac, add MXF captured videos to the program. You can not only click "Add video" button to import Canon C300 MXF files.  You are allowed to load .MXF clips to Pavtube MXF Converter for Mac directly from your camera folder or a folder archived on your computer's HDD. If you want to load multiple .mxf files to convert for FCP X at a time, just drag and drop the entire folder into the Mac MXF Converter software.  Step 2. Click the "Format" option, select the "Final Cut Pro > Apple ProRes 422 (*.mov) as target format. And navigate to the Final Cut Pro group, you will notice that there are profiles with Apple ProRes 422(HQ) (*.mov), Apple ProRes 422(LT) (*.mov), Apple ProRes 422(Proxy) (*.mov), Apple ProRes 4444 (*.mov). Apple ProRes 422 (*.mov) format is specially designed for using in Final Cut Pro X[/url] (include FCP 6/7). (The Apple ProRes 422 (Proxy) (*.mov) codec is intended for offline editing and contains 30 percent of the data rate of Apple ProRes 422)  And for editing Canon C300 MXF in iMovie/FCE, you can choose iMovie and Final Cut Express > Apple InterMediate Codec(AIC)(*mov).  Some more helpful features of the batch MXF to MOV Converter for Mac: 1. Adjust video and audio parameters. (Optional) Click "Settings" button to customize the output video and audio settings by yourself. But if you are not good at it, you'd better use the default parameters, they will ensure you a good balance between file size and image quality basically. You can change the resolution, bitrate, frame rate as you need. 2. Editor (next to "Add" icon)- click to set deinterlace, denoise, mute, volume up, trim, crop, etc.  Step 3. When above steps finished, you can click "Convert" button to start converting Canon C300 MXF to ProRes/AIC MOV for FCP/FCE/iMovie with a super fast speed. with the excellent C300 MXF to MOV Converter, you can deal Canon C300 MXF footage on Mac with best video and audio quality as you want. After converting Canon C300 MXF files, just according to the following tutorial import the output Apple PreRes 422 .mov files to Final Cut Pro 6/7/X for editing the video. Optimize your workflow and save time with the Apple ProRes compression for Final Cut Pro X. You can also import the output AIC MOV videos to iMovie/FCE for editing in full HD. Additional tips: 1. This Mac version can run on Yosemite smoothly and users don't have to worry about any conversion lagging off. 2. How to transfer files into FCP or iMovie may be very helpful for newbie who just walk into Mac world. 3. If you intend to merge multiple MXF clips into one file, simply check "Merge into one file" box. 4. If you would like to export Apple ProRes with multiple audio tracks kept, you may change to Pavtube iMixMXF program. You're advised to take the article.  5. To learn more conversion solutions for Canon MXF clips captured, please refer to Pavtube's Canon Column page. 6. For Win users, Pavtube MXF Converter added new features like H.265/HEVC will allow you to maintain even improve the original videos while only half file size compared to original ones. I hope can help you learn more. A happy work. Have a nice day! Never miss to get Saving up to $44.1, MXF/MTS/M2TS/MKV/FLV/MOV Converter.etc at Pavtube Bundles Deals! Source: http://mediaconverting.blogspot.com/2013/0...es-aic-mov.html
Sun 8 Feb 2015, 06:56
|
Is there a good way to import Panasonic AJ-PX800 MXF files into Avid Media Composer on Mac OS X 10.10 Yosemite? In this article you will learn the best way to convert AJ-PX800 MXF to Avid native format (DNxHD .mov) and then import Avid DNxHD mov files from your Mac to Avid Media Composer. Question: Can I import Panasonic AJ-PX800 MXF to Avid MC directly? "Hi, there, I'm a film director. I shot a feature documentary film with the crew. One of our cameras was Panasonic AJ-PX800. I needed to transform some MXF files from my Panasonic AJ-PX800 into Avid native format(DNxHD .mov) so that I can use them in Avid Media Composer flawlessly. What's the best way to accomplish that? Anyone got any suggestions?"  Cause the AJ-PX800 records 1080/60i as well as 24p, 30p and 720p HD/SD multiple format, with that, picture quality and recorded data rate can be selected from AVC-Intra or AVC-LongG according to the application. So in this way, how to enjoy editing our Panasonic AJ-PX800 H.264/AVC MXF files in Avid Media Composer could not be an easy workflow. However, if you got some useful MXF converting tips, you may know more about this situation. Now, let's go back to the main topic. To be able to transcode Panasonic AJ-PX800 H.264/AVC MXF files to editable files for Avid Media Composer, you will need to download and install third party software like Pavtube MXF Converter for Mac. With this app installed, you are able to transcode or rewrap Panasonic AJ-PX800 MXF media to DNxHD MOV for editing in Avid Media Composer with a high quality preserved. Not only for Avid MC, but also it can be available for others like Premiere Pro, FCP, VLC, DVD, Youtube, Apple TV/iPad, HDTV, Media Servers, etc. In this post, we would guide you through the process of converting Panasonic AJ-PX800 MXF recordings to Avid DNxHD .mov for editing on Avid Media Composer with excellent quality on Mac OS X 10.10 Yosemite, 10.9 Mavericks and 10.8, 10.7, etc. Just free download or buy this best MXF to Avid DNxHD converter: How to convert Panasonic AJ-PX800 H.264/AVC MXF to DNxHD MOV for Avid Media Composer? Step 1. Add your original MXF files from Panasonic AJ-PX800 Start up MXF Converter for Mac as a professional P2 MXF to Avid DNxHD Converter. When its main interface pops up, click 'Add File' to input your source media.  Step 2. Select Avid DNxHD .mov as output for Avid MC From 'Format' bar, select 'Avid DNxHD (*.mov)' as output format under 'Avid Media Composer' column.  Step 3. Custom video and audio settings If necessary, you can click 'Settings' button and go to 'Profiles Settings' panel to modify video and audio settings like video encoder, resolution, video bit rate, frame rate, aspect ratio, audio encoder, sample rate, audio bit rate, and audio channels. 3D settings are also available. Step 4. Start Panasonic AJ-PX800 P2 MXF files to Avid DNxHD MOV Conversion Move back to the main interface after you finished the preparation work. Hit the 'Convert' button, without too much time we need to wait, we can get the output Avid DNxHD mov files. Then we only need to import DNxHD mov files to Avid at anytime you want, that's our enjoyment time. Then what are you still hesitating? Just go ahead to get this helpful P2 MXF File Converter to let it do you a favor to edit your Panasonic AJ-PX800 MXF files with Avid Media Composer on Mac OS X 10.1 Yosemite now! (If you're running Avid on your Windows computer, pls try our windows version: Pavtube MXF Converter) Supported MXF camcorders include:- Sony Camcorders: PMW-400L, PMW-400K, PMW-500, PMW-TD300, PMW-200, PMW-300K1, PMW-160, PMW-100, PMW-F55, PMW-F5, PMW-320K, PMW-F3, PMW-F3K, PMW-F3L, PMW-50, PMW-EX30, PXW-Z100, PMW-1000, XDCAM HD422 Camcorder, etc.
- Panasonic Camcorders: AG-3DP1, AG-HPX170PJ, AG-HPX600PJF, AJ-HPX2000, AJ-HPX3100GJ, AG-HPX250PJ, AG-HPX255, AG-HPX370, AG-HPX500, AG-HPX600PJ, AG-HPX600PJB, AJ-PX5000G, AJ-HPX2700, AJ-HPX3700, etc.
- Canon Camcorders: XF100, XF105, C300, XF300, XF305, C500, XF200, XF205
Have a nice day! Happy New Year 2015! Read more:Good news! Pavtube Bundles Deals are coming! It's a time for taking a break from work and relaxing. And now you can enjoy your colorful time with good featured products at "Pavtube Bundles Deals". Go ahead and click the link to get your coupon. Save up to $44.1! Never miss!!!- MTS/M2TS Converter for Mac($29) + MXF Converter for Mac($29) = Only $29.9
- MTS/M2TS Converter for Mac($29) + MKV Converter for Mac($29) = Only $29.9
- MTS/M2TS Converter for Mac($29) + FLV/F4V Converter for Mac($29) = Only $29.9
- iMixMXF($45) + HD Video Converter for Mac($35) = Only $54.9 .....
 Source: http://digitalmediasolution.altervista.org...mcf-to-avid-mc/
Sun 8 Feb 2015, 06:52
|
To most people, they may not familiar with the XAVC/XAVC S format, and don't know how to play XAVC videos on QuickTime smoothly, in this article you will know how to convert XAVC/XAVC S video for playing on QuickTime player easily and freely. Model: Sony PMW-F55, F5 The camera PMW-F55, F5 which used XAVC format was recently unveiled by Sony. XAVC is a new recording format which can support 4K resolution (4096 * 2160 and 3840 * 2160) at up to 60 fps, introduced by the famous Japanese camera manufacturer Sony on October 30, 2012. However, .xavc is still not as popular as other kinds of video formats such as AVCHD and MXF, so when you deal with the XAVC/XAVC-S footages, for example, importing Sony XAVC/XAVC-S to Mac applications like QuickTime for playing, you may encounter some format compatibility or video/audio synchronization problems.  This article is written to help XAVC users to solve such kind of problems by using XAVC to QuickTime Converter ( Pavtube Video Converter). It can help users fix all kinds of XAVC problems without losing the video quality. It offers an easy way to convert XAVC to MOV for playback on Mac. With it, you will be able to import XAVC videos to your QuickTime for playback with ease. Besides, by converting XAVC to MOV, you can transfer the generated files to your iPhone, iPad, Apple TV 3, etc to play with ease. If you are a Mac user, you can turn to XAVC Video Converter for Mac, which share similar functions with the Mac Version. How to Convert Sony XAVC/XAVC S to QuickTime .MOV on Windows Step 1: Load XAVC footages to the XAVC Video Converter Run Pavtube Sony XAVC to MOV Converter. Click "Add file" or "Add from folder" button, browse to the XAVC footages and load them to the converter.  Step 2. Choose QuickTime MOV as the output format To transfer Sony XAVC/XAVC-S to QuickTime on Windows, the best way is to convert XAVC to MOV. Click on the drop-down list of "Format", and follow "Common Video" -> "MOV-QuickTime (*.mov)" or "Common Video" -> "H.264 Video (*.mp4)". To retain the HD video quality, you can select "HD Video"> "H.264 HD Video (*.mp4)". 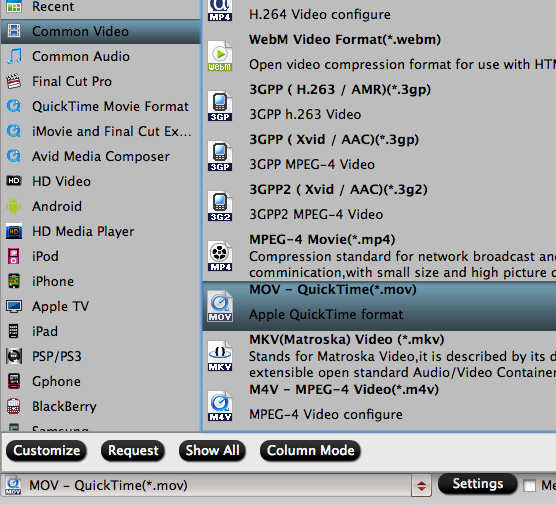 Tips: Tips: Click the "Settings" button and set proper video/ audio parameters. You can reset set the video size, bitrate and fame rate. If you would like to use default settings, simply skip this step. Step 3: Start converting XAVC/XAVC S to MOV After the options above, press the "Convert" button to launch the conversion from XAVC/XAVC-S to QuickTime mov on Windows 8.1/8. Just take a free try. When the conversion process finished, you can get the output MOV files and then use them on your Quicktime player without any problems. Hope this XAVC to MOV converter can give you some help. Tip: Like to edit your Sony XAVC/XAVC S video in Adobe Premiere Pro? See the following article: XAVC and Adobe workflow See also:Good News! Pavtube Bundles Dealsare coming! If you want to import/preserve/mix multi-track MXF in MKV/MP4/MOV formats, get multi-track Apple Prores MOV for further editing in Final Cut Pro (X), the following bundled software is your best choice:? Video Converter($35) + MXF MultiMixer($45) = $54.9, Save $25.1 ( buy link) Video Converter for Mac($35) + iMixMXF($45) = $54.9, Save $25.1 ( buy link) MXF MultiMixer/iMixMXF Key Features:-Import/preserve/mix multi-track MXF in MKV/MP4/MOV formats. -Output multi-track Apple Prores MOV for further editing in Final Cut Pro (X). -Support DVCPRO/HDV/Avid DNxHD/AIC output -Convert MXF to any other formats for editing, playing, or broadcasting. -Merge/split/trim/crop MXF footages. Video Converter for Windows/Mac Key Features:-Convert from and to any common SD/HD video and audio format. -Support Apple ProRes/DVCPRO/HDV/Avid DNxHD/AIC encoding. -Output formats for Windows/Mac editing software, e.g. FCP, iMovie, FCE, Avid, Adobe Premiere, Sony Vegas Pro, etc. -Output formats for different playback devices, hdtv, hd media players, etc. Go ahead and click the link to get your coupon. Save up to $44.1! Never miss!!! Source: http://pc-mac-compatibility-issues.blogspo...r-playback.html
Sun 8 Feb 2015, 06:45
|
Summary: AVCHD files not playing in VLC? In this article, I will share my experience and offer an easy way to help you play Sony AVCHD .mts videos with VLC media player freely on Mac OS X Yosemite or Mavericks. Introduction:I seem to be the the band's servant for recording our concerts. They want free DVDs but I may quit the band. As I like freely movie making and I have done many videos for my own original music on Youtube. Recently, I find some interesting videos about a concert at the Michigan State University Community Music School of Detroit featuring the beginning band, the advanced band and the jazz band. Now I collect various footage, some I use are stolen footage from YouTube, some usually from different cameras owned by friends. Most recently a Sony Handycam. Posting at the YouTube channel of the MSU Detroit Community Music School or the band director's channel, but definitely not my channel.  This time my project required importing MTS video files from my buddy's Sony camcorder. The files would play in VLC, but would not import into any of the converter apps I already had installed (e.g., MPEG Streamclip). I use Duck Duck Go for search, because I distrust Google and I guard my privacy. I did a search for "Mac MTS to QuickTime convertor" and the Pavtube MTS/M2TS Converter for Mac came up high on the list, so I bought that for $29. I was not a careful shopper -- I blame my pushy friend for this. I like the wide variety of formats Pavtube converts and use it directly convert MTS video to VLC readable formats, Apple ProRes for FCP, Apple Intermediate Codec for FCE editing. Also I have used MPEG Streamclip for years. I like that because it genuinely is free. Although I may have sent them money as shareware. For freeware, it has a better interface than Pavtube. In fact, VLC player is a powerful media player for viewing movies or videos on Mac and Windows. While, I find problems with low video quality or incapability of MTS video playback with VLC. An quick workaround I find to solve the issues is to convert the MTS files from Sony to common formats (like MP4, MOV, AVI, MKV, MPEG, etc.) to fit the local VLC media player with Mac MTS to VLC Converter from Pavtube. If you are Windows users, you can try MTS/M2TS Converter. Overall, this program works successfully in MTS to MP4 conversion even you have a bunch of large MTS files. I have tried it to encode MTS to MP4, it turns out playing Canon, Sony, Panasonic MTS on Mac smoothly and at original quality. It's the best software application for Mac users. What's more, this converter also supports many of other video formats like MOV, MKV, AVI, WMV, FLV, MPG, SWF, etc. on Mac(Yosemite and Mavericks included). Below is easy steps for you, you can convert Sony MTS to VLC player compatible formats for watching in few steps. How to convert Sony MTS video files for VLC playback freely? Step 1: Add mts video files Run MTS to VLC Converter for Mac on your Mac computer. Transfer the individual .MTS file or MTS file structure from Sony to HDD first, and then click add to import the video files to the converter.  Step 2: Choose H.264 MP4 as output format. In "Format" drop down list box, you may select best video format for plaing on Mac. To convert Sony MTS to MP4 format, if you want to get common MP4 files for playback, you can choose Common Video -> H.264 Video (*.mp4); if you want to get HD MP4 files to use, you can choose HD Video -> H.264 HD Video (*.mp4).  Step 3: Start Convert Click "Convert" in the main interface to start transcoding Sony MTS footage to Mac H.264 MP4. After conversion, you can use converted MP4 files for playback easiliy and smoothly. More Tips:Alternative Freemake Video Converter for Mac?Issues within Sony HDR-AS100V XAVC S and Adobe Premiere Pro CSWorkflow: XAVC S to Avid Media Composer for Further Dispose?Canon EOS Movie Plugin-E1 for Final Cut Pro 1.5 for Mac OS XConvert Sony Handycam MTS to Quicktime MOV for Playback Convert MKV FLAC to AC3/AAC 5.1 Audio: Watching on HDX-1000 Network Media PlayerSmoothly playing AVCHD MTS files on Mac without slow motion problemTop 5 Free Audio/Video Conversion Tools for Windows/Mac UsersMake Blackmagic Production Camera 4K footage editable in FCP 6/7/XTurn MKV FLAC 5.1 to AC3 5.1 for Playing on VLCGood news! Pavtube Bundles Deals are coming! It's a time for taking a break from work and relaxing. And now you can enjoy your colorful time with good featured products at "Pavtube Bundles Deals". Go ahead and click the link to get your coupon. Save up to $44.1! Never miss!!!- MTS/M2TS Converter for Mac($29) + MXF Converter for Mac($29) = Only $29.9
- MTS/M2TS Converter for Mac($29) + MKV Converter for Mac($29) = Only $29.9
- MTS/M2TS Converter for Mac($29) + FLV/F4V Converter for Mac($29) = Only $29.9
- iMixMXF($45) + HD Video Converter for Mac($35) = Only $54.9 .....
Source: http://mts-to-aic-converter.com/playback-edited-mts-on-vlc/
Thu 5 Feb 2015, 07:27
|
If you got some troubles in editing Sony a7II XAVC S recordings in Avid Media Composer for further editing, here we can give you some XAVC S and Avid suggestions. You cannot get rid of the trouble when importing your XAVC S MP4 recordings to Avid Media Composer which shot from Sony a7II camera? If so, you may wish to read this post. It explains an easy to convert Sony a7II XAVC S video for editing in Avid with good quality. From XAVC S MP4 to DNxHD MOV, you are supposed to get a XAVC to Avid Converter that can do this work well. See also: Sony A7II Hands-On Review and Video Recordings Tips  Issues when importing Sony a7II XAVC files to Avid Media Composer? "Hi, I'm trying to import video recordings from the new Sony a7II to Avid MC6. The camera uses a flavor of MP4 that is called XAVC S. I have tried the traditional importing method, but there's no go. I have also tried the AMA plug-in created by Sony, unfortunately, it doesn't seem to support Sony a7II XAVC S footage. Does that mean I have to use 3rd party software to convert formats? If so, does anyone know of a good XAVC S to Avid Converter that is worth trying?' Relationship between XAVC S files and NELs(Example: Avid MC) Issues when importing Sony a7II XAVC files to Avid Media Composer? "Hi, I'm trying to import video recordings from the new Sony a7II to Avid MC6. The camera uses a flavor of MP4 that is called XAVC S. I have tried the traditional importing method, but there's no go. I have also tried the AMA plug-in created by Sony, unfortunately, it doesn't seem to support Sony a7II XAVC S footage. Does that mean I have to use 3rd party software to convert formats? If so, does anyone know of a good XAVC S to Avid Converter that is worth trying?' Relationship between XAVC S files and NELs(Example: Avid MC) Since the XAVC S footage is a peripheral non-standard format which is not supported by Avid Media Composer, Some other NELs are not suitable too, such as Adobe Premiere Pro, Sony Vegas Pro etc. In order to import Sony Alpha a7II XAVC S footage into Avid Media Composer for smoothly editing, we can render to the famous third-party software Pavtube XAVC S to Avid Converter to help us to convert XAVC to DNxHD .mov. Note: For those Mac users, XAVC S Vdieo Converter for Mac is also allowed here. What you need to mention is: Pavtube all Mac softwares will upgrade supporting XAVC in Feb 8, 2015. Look forward to it! Guide: How to convert XAVC S to DNxHD MOV for editing in Avid MC? Step 1: Start up HD Video Converter as a professional Sony a7II XAVC S MP4 Converter. When its main interface pops up, click 'Add File' to input your source media with individual clips or in a complete folder.  Step 2. Select suitable output for Avid Convert Sony a7II XAVC S MP4 files to DNxHD for Avid MC. From 'Format' bar on the main interface, just drop down the list and select 'Avid Media Composer DNxHD (*.mov)' as output format under 'Avid Media Composer' column.  Step 3. Optional function to customize video and audio settings If necessary, you can click 'Settings' button and go to 'Profiles Settings' panel to modify video and audio settings like video encoder, resolution, video bit rate, frame rate, aspect ratio, audio encoder, sample rate, audio bit rate, and audio channels. 3D settings are also available. Step 4. Then we are going to come to the final step, click the 'Convert' button on the main interface and start out job. If you are the first time to work with this Avid MC, some related tips you can take a reference in this videos to Avid transferring article. What's more, this third-party can hold almost all formats for editing in various popular editing softwares, that's why it has a good reputation online. More guides: Source: http://digitalmediasolution.altervista.org...s-in-avid-mc-6/
Thu 5 Feb 2015, 07:18
|
Summary: If you got some M2T files and are troubling with importing M2T files into Premiere Pro, just follow the tutorial to convert .M2T files to MPEG-2/WMV/MOV for use in Adobe Premiere Pro on Mac OS X(Yosemite/Mavericks included). M2T is a HDV Video File- High-definition video recording format used by many HD camcorders; commonly referred to as "HDV;" uses MPEG-2 compression to store HD video data on DV or MiniDV tapes; supports resolutions of 720p and 1080i.  "I pulled terabytes of HD content onto the PC via HDVsplit and the file extensions are .M2T. Now it seems that it is some kind of wrapper/transport that the Premiere Pro does not like. How do I go about making them Premiere friendly? Thanks!" "I pulled terabytes of HD content onto the PC via HDVsplit and the file extensions are .M2T. Now it seems that it is some kind of wrapper/transport that the Premiere Pro does not like. How do I go about making them Premiere friendly? Thanks!" So how to edit M2T files in Premiere Pro on Windows and Mac smoothly? The best way is to convert M2T to Premiere Pro supported format, like MEPG-2/WMV format, which is best for Premiere Pro, and then you can edit the converted videos in Premiere without problems. ( Adobe Premiere Pro Supported Formats) To get better work with M2T file in Premiere Pro, you can get help with this professional M2T to Premiere Pro Converter for Mac and M2T Converter for Windows from Pavtube, which can convert M2T to MPEG-2/WMV with perfect quality and fast conversion speed. What's more, it is the ideal M2T video conversion tool that offers several editing functions like cropping video dimension, trimming file length, adjust playing effects, etc. The converted videos are well supported by Premiere Pro and you can get smooth editing process. Following is our workflow. See also: Top 5 Best MTS/M2TS Converter for Mac Reviews Part I: Transcode M2T to MPEG-2/WMV for editing in Premiere Pro on Mac 1. Run Pavtube MTS/M2TS Converter for Win/Mac as the best M2T Converter for Premiere Pro. Click "Add Video" or "Add from folder" icon to load .m2t video. 2. Choose " Adobe Premiere/Sony Vegas --> MPEG-2 (*.mpg) or WMV (VC-1) (*.wmv)." as target format for editing in Premiere Pro.  3. Click "Settings" button and enter "Profile Settings" panel to adjust video and audio settings if necessary. Users are free to reset codec, bit rate, frame rate, sample rate, and audio channels. 4. Click the big button "Convert" to start converting M2T to MPEG-2/WMV for Premiere Pro. Part 2: Import converted video to Premiere Pro. Launch Adobe Premiere Pro, and learn Adobe Premiere Pro workflow for video importing. Read more:Good news! Pavtube Bundles Deals are coming! It's a time for taking a break from work and relaxing. And now you can enjoy your colorful time with good featured products at "Pavtube Bundles Deals". Go ahead and click the link to get your coupon. Save up to $44.1! Never miss!!!- MTS/M2TS Converter for Mac($29) + MXF Converter for Mac($29) = Only $29.9
- MTS/M2TS Converter for Mac($29) + MKV Converter for Mac($29) = Only $29.9
- MTS/M2TS Converter for Mac($29) + FLV/F4V Converter for Mac($29) = Only $29.9
- iMixMXF($45) + HD Video Converter for Mac($35) = Only $54.9
......
Source: http://handycameratips.jimdo.com/2013/09/2...n-premiere-pro/
Thu 5 Feb 2015, 07:13
|
In this article, you will know details about XAVC format, and the best way to edit Sony 2K/4K XAVC on Windows editors like Pinnacle, Avid MC, Adobe Premiere, Sony Vegas, Windows Movie Maker, Cyberlink, Sorenson Squeeze, etc. 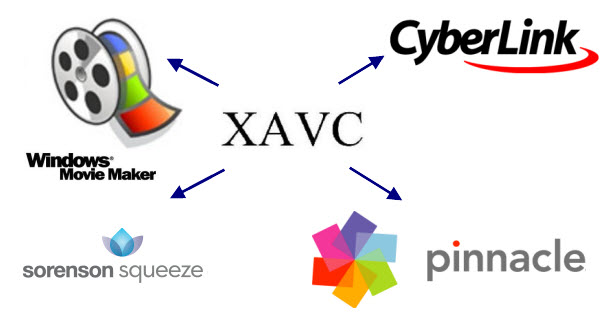 XAVC format XAVC format XAVC is a brand new recording format introduced by the famous Japanese camera manufacturer Sony on October 30, 2012. XAVC is usually a video format that was introduced by Sony and extensively exist in Sony PMW-F55 and Sony PMW-F5. XAVC will be used by more and more popular HD camcorders with features of level 5.2 of H.264/MPEG-4 AVC which is the highest level supported by that video standard. XAVC can support 4K resolution (4096 × 2160 and 3840 × 2160) at up to 60 frames per second (fps). XAVC to Windows Editor Solution Since XAVC is quite new a format that most of the editing application and programs such as Pinnacle, Cyberlink, Sorenson Squeeze, Windows Movie Maker, and more, cannot run such footages. In this case, you need to transcode the the unfriendly 2K or 4K XAVC footages to other kind of popular video formats like MPEG-2, WMV, AVI, MOV, etc. for better compatibility by using the best XAVC Video Converter. Pavtube XAVC Video Converer(Pavtube Video Converter) is particularly designed with future-proof technology to solve all the format compatibility issues of the new Sony XAVC files. It can help all Windows users losslessly convert the 2K/4K XAVC footages to most popular video formats as well as importing XAVC to Pinnacle Studio 17, Sony Vegas Pro 13/12/11, Avid Media Composer, Adobe Premiere, Cyberlink, Sorenson Squeeze, Windows Movie Maker, etc. for editing freely. Besides, this smart XAVC video converting program also provides users with useful editing functions and new features such as converting 2K/4K XAVC videos and other SD/HD videos to H.265/HEVC MP4, 3D MKV/AVI/MOV/MP4 and various HD or Common video and audio formats on Windows (Windows 8.1 included). How to encode 2K/4K XAVC files for editing in Pinnacle, Vegas Pro, Avid, Premiere, Cyberlink, Windows Movie Maker freely? To use XAVC footages on Windows Editing Software smoothly, the best way is to transcode Sony XAVC to Windows PC best supported codec. Now you can follow the easy steps below to convert XAVC to MPEG-2, WMV, AVI, MOV for All Windows Editor. Step 1. Download Pavtube Windwos 8.1 XAVC Video Converter, follow the prompts to install the program. Click "Add" to load XAVC video files or directly drag the files into file list. 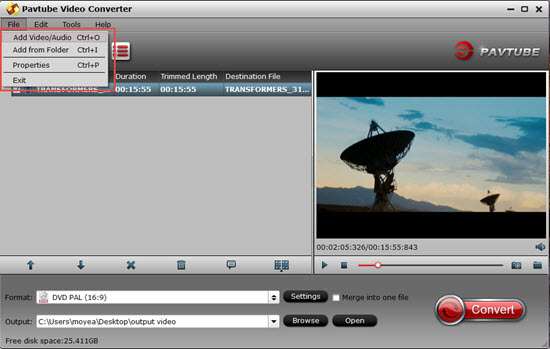 Step 2. Step 2. Click "Format" bar to determine output format. This software has many presets for editing software, you just need to choose in the profile column. For editing with Pinnacle, Cyberlink, Sorenson Squeeze and Windows Movie Maker, you can choose "WMV (VC-1) (*.wmv)" , "MPEG-2 HD Video (*.mpg)" or "MOV(AVC) (*.mov)" from "Adobe Premiere/Sony Vegas" option and more.  Step 3. Step 3. If you would like to customize the video and audio parameters, you can click "settings", adjust the parameters as you want, like Video Codec, aspect ratio, bit rate, frame rate, Audio codec, sampling rate, bit rate, channels. Step 4. Click "Convert" to start to convert XAVC to Windows editing software. With this XAVC Video Converter, it becomes easy for you to convert Sony 2K/4K XAVC videos to Windows editing software compatible file formats for editing in Pinnacle, Sony Vegas Pro, Avid MC, Adobe Premiere, Cyberlink, Sorenson Squeeze and Windows Movie Maker, so you are recommended to take a try. For Mac software, like FCP, iMovie, FCE, etc., you can convert 2K/4K XAVC footage to Apple ProRes/AIC MOV for editing with the professional Mac XAVC Converter. See also: Source: http://pc-mac-compatibility-issues.blogspo...or-windows.html
Tue 3 Feb 2015, 08:21
|
Hey guys, want to get easy XAVC S video solution for using in Mac/Windows? The article offers you a darn easy Sony A7II XAVC S footage workflow for converting your A7II XAVC S video to MOV, AVI, DNxHD, AIC, MPEG-2, WMV and then edit, play or upload the converted XAVC S videos on Mac or Windows. Tips: Are you still confused with the XAVC recordings for some HD cameras such as Canon. Panasonic or Sony? Here is a XAVC file solution Q: Which kind of Sony series camera do you like as the best? A: Though more and more HD cameras have been released by Sony, I just make Sony A7II as my favorite. With the stable shooting ability and the high definition output footage XAVC S, it is popular among our photograghers. As a teacher who teaches video production in the studying courses, I'm trying to use my Sony A7II camera to shoot some recordings of my students and pick them out to show in the Students' Film Festival', I need to edit the output videos on my Mac, I installed FCP X there. However, it seemed that XAVC files are not so compatible this program, right?  While enjoying the stunning videos recorded of HD image quality, While enjoying the stunning videos recorded of HD image quality, many users are having problems when trying to edit Alpha a7II footage in some popular editing tools like FCP, iMovie, Premiere, etc. What we need here is a Pavtube XAVC S Video Converter for Mac / Windows! Easy operations to do with Sony a7II XAVC S files and make them accepted by common editing programs and media players with a high quality preserved. More, the Pavtube Mac XAVC S Video Converter software is also able to convert AVCHD, H.264/AVC, MPEG-2, MP4, MOV, XACAM, XDCAM EX, MXF, P2 MXF, M2TS, TS, Tivo, AVI, FLV, F4V, M4V, WebM, etc. footage to other intermediate formats for using freely. How to convert Sony A7II XAVC S files to MOV/AVI/MPEG-2/WMV/DNxHD/AIC for editing, playing, uploading on Mac/Windows? Step 1. Free Download the Mac or Windows Sony XAVC S Video Converter on your computer. Install and run it. It's excellent Sony XAVC S converter which can convert Sony Alpha a7II XAVC S to any formats you need, such as Apple Prores 422 MOV, Apple InterMediate Codec MOV, QuickTime MOV, MPEG, AVI, WMV, DNxHD, MOV, etc. Load your files in with "Add video" or "Add from folder".  Step 2. Click "Format" bar to choose output format for using For each editing apps or other multimedia devices, you should choose the different format on the output lsit. For example, we can choose the "Final Cut Pro" -> "Apple ProRes Codec 422 (*.mov)" as the suitable one. As the screen shot showed: 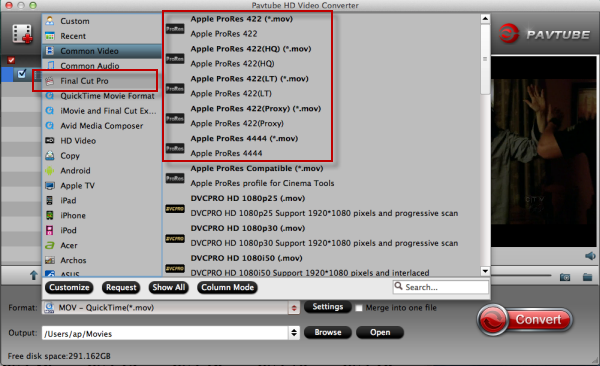 Tips Tips: For other formats like AVI, MPEG-2 or WMV, MOV, etc., you can also find them out on the output list if you need. More advanced functions? Why not get into the ' Settings' button to know more? We can here adjust our output videos as video codec, video size, bitrates, frame rate or even the audio channels. 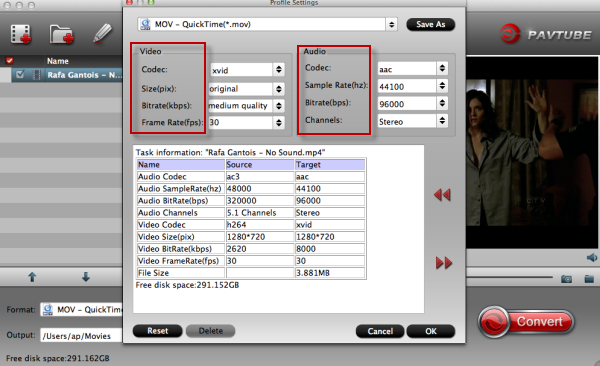 Step 3. Click "Convert" button to start the conversion from Sony Alpha a7II XAVC S footage to FCP Apple ProRes MOV on Mac OS. After the Sony a7II XAVC S video converter workflow, you can go to the output folder to find the converted XAVC S video files under Mac/Windows without problems. (Mac OS X Yosemite, Mavericks and Windows 8.1/8 included) Tips:1. Before you try to do the XAVC S video conversion, if you are also a FCP X user, please make sure that you have installed the Apple ProRes Codec manually since the FCP X asks users to install it by themselves. 2. Other questions about other Sony series cameras? On the Sony Topic page here, we think we should learn more. You may like more: Good News! Pavtube Bundles Dealsare coming! If you want to import/preserve/mix multi-track MXF in MKV/MP4/MOV formats, get multi-track Apple Prores MOV for further editing in Final Cut Pro (X), the following bundled software is your best choice: Video Converter for Mac($35) + iMixMXF($45) = $54.9, Save $25.1 ( buy link) Video Converter($35) + MXF MultiMixer($45) = $54.9, Save $25.1 ( buy link) MXF MultiMixer/iMixMXF Key Features:-Import/preserve/mix multi-track MXF in MKV/MP4/MOV formats. -Output multi-track Apple Prores MOV for further editing in Final Cut Pro (X). -Support DVCPRO/HDV/Avid DNxHD/AIC output -Convert MXF to any other formats for editing, playing, or broadcasting. -Merge/split/trim/crop MXF footages. Video Converter for Windows/Mac Key Features:-Convert from and to any common SD/HD video and audio format. -Support Apple ProRes/DVCPRO/HDV/Avid DNxHD/AIC encoding. -Output formats for Windows/Mac editing software, e.g. FCP, iMovie, FCE, Avid, Adobe Premiere, Sony Vegas Pro, etc. -Output formats for different playback devices, hdtv, hd media players, etc. Go ahead and click the link to get your coupon. Save up to $44.1! Never miss!!! Source: http://mts-to-aic-converter.com/edit-a7ii-...mov-avi-mpeg-2/
Tue 3 Feb 2015, 08:12
|
Summary: MXF files not reading in Premiere Pro CS6! If you get the importing error message while importing Sony PMW-200 XDCAM MXF media files to Adobe Premiere Pro CS6, the MXF to Premiere Pro CS6 Converter will be the best solution for you. Sony have been listening and as a result of customer feedback they developed the new PMW-200 handheld camcorder. Designed to meet the needs of broadcast productions the camera records on to solid state media using 50 Mbit/s 4:2:2 XDCAM HD. This is the exact same codec as used in the highly regarded PDW-700, F800 and PMW-500 shoulder mount broadcast camcorders.  I had a friend do me a favor, let me borrow his Sony PMW-200- a great looking camera - for a shoot. While my workflow with Sony Vegas works perfectly with these files, but my Premiere don't always have the codec for .mxf files. Well I would like to say Adobe Premier Pro imports and edits XDCAM formats in the native recording codec. So to edit Sony PMW-200 XDCAM media in Adobe Premiere smoothly, the easy workaround is to transcode Sony XDCAM MXF to MPEG-2 or MOV or WMV format which is friendly with Premiere. Here listed a step-to-step guide. First of all, free download Pavtube MXF to Premiere Pro CS6 Converter for Mac. This Mac Sony XDCAM MXF converter can easily convert Sony PMW-200 XDCAM MXF files without quality loss. It can generates best editing format/codec for filmmakers and video enthusiasts to use in different NLE apps, such as Adobe Premiere Pro CC/CS, After Effects CS/ CC, iMovie, FCE, FCP, Avid Media Composer, and more. If you are on Window PC, please get the MXF Converter. Just download it and follow the workflow using Adobe Premiere Pro with Sony PMW-200 XDCAM on Windows or Mac. How to convert Sony PMW-200 XDCAM MXF to Adobe Premiere Pro editable format?Step 1. Connect your Sony PMW-200 XDCAM HD422 camcorder to Mac and keep it on, or use a card reader to transfer your footage to Mac. Get this Sony MXF to Adobe Converter installed, click top left two icons to load individual videos or the entire folder correspondingly.  Step 2. Step 2. Choose best format for editing in Adobe Premiere Pro CS5. Click the drop-down list besides "Format", choose "Adobe Premiere > MOV(AVC)(*.mov)" as the most compatible format as well as best video quality for CS5. You can also choose "MPEG-2 (*.mpg)", "WMV (VC-1) (*.wmv)" or Apple ProRes 422 (*.mov).  Step 3. Step 3. Adjust output video settings including video size, codec, bitrate, frame rate by clicking "Settings", all according to your needs.  Step 4. Click the big red circle to start the Sony PMW-200 XDCAM MXF conversion for Premiere Pro. Wait for a while, you can get the fresh hot converted XDCAM MXF video which is compatible with Adobe Premiere Pro on Mac Yosemite/Mavericks. Tips:Click here to learn: How to import Media Files to Premiere Pro on Mac. Read more: Good News! Pavtube Bundles Dealsare coming! If you want to import/preserve/mix multi-track MXF in MKV/MP4/MOV formats, get multi-track Apple Prores MOV for further editing in Final Cut Pro (X), the following bundled software is your best choice: Video Converter($35) + MXF MultiMixer($45) = $54.9, Save $25.1 ( buy link) Video Converter for Mac($35) + iMixMXF($45) = $54.9, Save $25.1 ( buy link) Source: http://camcordervideoshare.altervista.org/...-with-premiere/
Tue 3 Feb 2015, 08:06
|
This H.264 codec to FCP X workflow is the highest quality and best practice to transcode/prepare H.264 footage to Apple ProRes (HQ) and import ProRes into FCP X for diting on Mac OS X (Yosemite and Mavericks included). 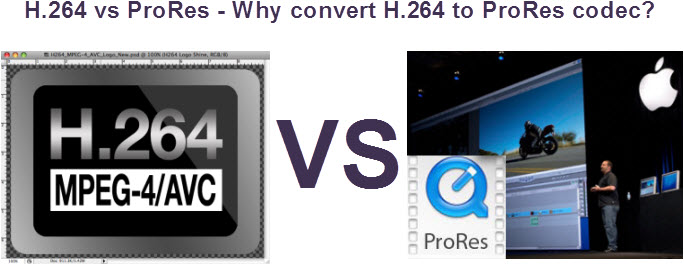 Question 1: H.264 vs Apple ProRes 422 Question - Urgent for Film Question 1: H.264 vs Apple ProRes 422 Question - Urgent for FilmHello,I've completed editing a film in FCP X with Apple ProRes 422 clips at 1920×1080. I sent a cut clip from the timeline to a SFX person via dropbox. He sent the polished clip (with the new SFX) back in H.264; he's not working on a Mac because he doesn't own one. I imported the new H.264 clip into my timeline and everything looks great. Question: Does this matter? Does it matter that a clip in the timeline is H.264, while all the others are in Apple ProRes 422 clips (the ones that didn't need effects)? My guess is that it's not because H.264 is a finishing format but I want to be sure. Thank you in advance for helping out. Much appreciated. One of the most common questions that I get from people regarding the new breed of DLSR cameras is "What's your post-workflow?" Source: http://www.dvxuser.com/V6/showthread.php?2...Urgent-for-Film Question 2: H.264 vs ProRes 422Hey, i was reading this post the other day where you guys were talking about apple's ProRes 422. i want to know if there is a high difference working with them, i have done a few projects with Final Cut Pro using the raw H.264 footage from my 60D without knowing about the pro res. Then i red the post and i wanted to test it out so i converted a few clips with compressor too see the difference while editing or rendering and i couldnt find much. What do you think? Source: http://forum.planet5d.com/index.php/topic/...-vs-ProRes-422/ Question 3: Apple ProRes vs H.264What's the difference between the Apple ProRes codec, the Apple ProRess HQ codec and the H.264 codec. I know the filesize of the ProRess is much more then the H.264, but what's the real difference?? Source: http://forums.macrumors.com/showthread.php?t=473438Question 4: Apple ProRes 422 vs. H.264 Editing w/ FCP XI am editing a project on Final Cut Pro X and was curious what format my video files should be for editing. I know ProRes 422 is a codec that pros use to edit and it has a much bigger file size, but I don't get the difference and which format I should be using to edit my project. Can someone please explain to me which format I should be editing on for my project! Thanks! Source: https://discussions.apple.com/thread/381862...=0&tstart=0*********************************************************** Solution: No matter you are a filmmaker, multimedia professional or still photographer, Canon or Nikon camera will be a choice due to its highly mobile, lightweight features including Canon 5D Mark, Canon EOS 650D, Canon PowrShot G1 X, Canon SX40, Canon ESO-1DX, Canon EOS 7D/5D, Canon EOS 60D, Canon EOS 550D, Canon EOS 500D, Nikon D5100, Nikon D3100 Nikon D800, and more. What these cameras have in common is that they can record 1080p H.264 codec MOV footages. H.264 (an MPEG-4 variation) is an aquistion (camera) and distribution (web streaming) codec. It's highly compressed, which means that the files are small, and Final Cut has to do extra work each time you play your timeline, make an edit, etc. Apple ProRes 422 is an editing codec. It uses much less compression, which means that the files are big, but Final Cut can play it more easily. Best practice is to edit in ProRes 422, especially if you have lots of layers and effects. That means you spend a little extra time optimizing your files to ProRes 422 before you start, but you save time in the long run. As you got into more complicated editing such as adding multiple clips and transitions and effects you would start to see a more pronounced difference, i.e. FCP would need to render more often and editing wouldn't be a smooth. H.264 is really optimized to be a delivery codec while ProRes is optimized to be an editing codec. That said, if you just need to do a simple edit and your Mac has the power to edit H.264 you can get away with it no problem, but if you plan to do a heavy edit with lots of transitions and effects and color grading you will be best served by ProRes. Just an alternative solution: Pavtube H.264 to ProRes Codec Converter which is able to convert H.264 videos to Apple ProRes 422 HQ (*.mov), Apple ProRes 422 (*.mov), Apple ProRes 422 (LT) (*.mov), Apple ProRes 422 (Proxy) (*.mov) and ProRes 4444 (*.mov). ( 2015 Top 5 Best Mac HD Video Converter Review for Camcorder Lovers) a. ProRes 422 (HQ): offers the utmost possible quality for 4:2:2 or 4:2:0 sources and provides target data rate of approximately 220 Mbps and higher quality than Apple ProRes 422; b. ProRes 422: provides target data rate of approximately 145 Mbps and higher quality than Apple ProRes 422 (LT); c. ProRes 422 (LT): provides roughly 70 percent of the data rate of Apple ProRes 422 (thus, smaller file sizes than Apple ProRes 422) and higher quality than ProRes 422 (Proxy); d. ProRes 422 (Proxy): provides roughly 30 percent of the data rate of Apple ProRes 422 and high-quality offline editing at the original frame size, frame rate, and aspect ratio; e. ProRes 4444: offers the utmost possible quality for 4:4:4 sources and roughly 50 percent higher than the data rate of Apple ProRes 422 (HQ). How to Convert H.264 footage to Apple ProRes for FCP X on Mac OS X? Once your CF(CompactFlash) card or SD memory card is placed into a reader connected to your Mac, follow the instructure below to convert H.264 to ProRes by using Pavtube H.264 HD Video Converter for Mac. Step 1. Free download the trial version of Pavtube Mac H.264 to ProRes Converter, install it on your Mac and import the H.264 files from HD camcorders to the Mac H.264 to ProRes Converter, or drag recorded H.264 videos to the software.  Tip: If you have multiple recorded H.264 files, you can select the "Merge into one file" box to merge your files into one single file. ( Best MTS/M2TS Files Joiner on Mac Yosemite) Step 2. Hit the "Format" box and select one of the Apple ProRes codecs on the dropdown list. You are advised to choose "Apple ProRes 422 (*.mov)" or "Apple ProRes 422 HQ (*.mov)" format. Due to the difference in the compresstion standard of AVCHD and ProRes 422, the converted files are significantly larger than the original ones. If you prefer smaller file size, please choose "Apple ProRes 422 (LT) (*.mov)" instead.  Step 3. Start converting H.264 videos to ProRes 422 (HQ) by clicking on the "Convert" icon. Based on its multi-threading and transcoding technology, the whole conversion will be done within a short time. Batch converting is also supported by the Mac H.264 to ProRes Converter tool. Tip: If you wanna shut down the computer after the conversion automatically, just click Option and tick the box "Shut down the computer after conversion" before conversion starts. After the recorded H.264 video to ProRes conversion is 100% completed, please run the FCP and click "File > Import > Files" for editing H.264 video in FCP without any rendersing and quality loss. Besides the ability to transfer the converted H.264 files to FCP X, the versatile Pavtube H.264 HD Video Converter for Mac users can help you copy/edit H.264 files into iMovie, FCE, Adobe Premiere Pro CC, Premiere Pro CS, Premiere Elements, After Effects CC/CS, Avid Media Composer, DaVinci Resolve (Lite), iPhoto, Kdenlive, Keynote, Aperture 3, etc. Youtube Guides May be help you also: https://www.youtube.com/watch?v=YtsvdfZO9UwMaybe these articles can also help to you: Good News: Never miss to get Saving up to $44.1, MXF/MTS/M2TS/MKV/FLV/MOV Converter.etc at Pavtube Bundles Deals, such as: HD Video Converter for Mac($35) + DVD Creator for Mac($35) = $39.9, Save $30.1 HD Video Converter for Mac Key Features:-Convert 1080p/720p MKV, MOV, MXF, MTS, M2TS, M2T, TS, M4V, MP4, AVI, MPG, VOB, WMV, 3GP, FLV videos for playing, editing, uploading or burning. -Support ProRes/DNxHD/DVCPRO/AIC and other codecs for NLEs on Mac. -Convert HD footages from Sony, Canon, Nikon, Panasonic, JVC, etc. -Convert any video and audio for multiple playback devices. DVD Creator for Mac:-Create playable DVD disc, DVD folder and DVD ISO from different file types. -Make DVDs from TiVo, MTS, MOV, WMV, AVI, MPEG, MP4, MKV and more. -Burn ISO image file and DVD folder/VIDEO_TS to a DVD disc directly. -Create DVD movies with NTSC or PAL video standard. Source: http://mts-to-aic-converter.com/h264-vs-apple-prores-codec/
| |


