|
 Tue 14 May 2013, 08:42 Tue 14 May 2013, 08:42
|
I bought an iMac, but find that iDVD and iWeb are no longer part of the iLife. What is the solution? Do I have to buy an alternative dvd-burning program, and if so, which one? iDVD is Apples default DVD burning tool which allows you to burn QuickTime movies to DVD with ease. However, from Lion, iDVD no longer comes with every new Mac as Apple wants people to distribute home movies to friends and relatives via iCloud or the advanced Final Cut Pro X rather than send them a DVD burned with iDVD for free. Obviously, iCloud is not everyones choice. DVD is still a convenient media to transfer movies, or to watch movies on TV. If you think iDVD is a must-have, An ideal iDVD alternative will help you out. iFunia DVD Creator for Mac (mountain lion, lion included) is a great option. It supports all popular video formats and includes lots of beautiful DVD menu templates you can use to easily design a navigation menu with a play button and music. Below Ill show you how to burn video files to DVD with iDVD alternative for Mountain Lion. Free Download DVD Creator for Mac and install itStep 1. Drag and drop to import video filesWhen installation complete, launch DVD Creator by double clicking icon on desktop. After selected your media files in Finder, drag and drop them to the program. The iDVD Alternative supports all popular video formats used for downloaded videos, iTunes videos, camcorder videos and iPhone videos, either in HD or SD formats, including MOV, MP4, M4V, AVI, FLV, WMV, 3GP, MKV, MOD, AVCHD, RMVB, etc. Its the all-in-one solution to save your entertainment and memories to DVD for long time saving. 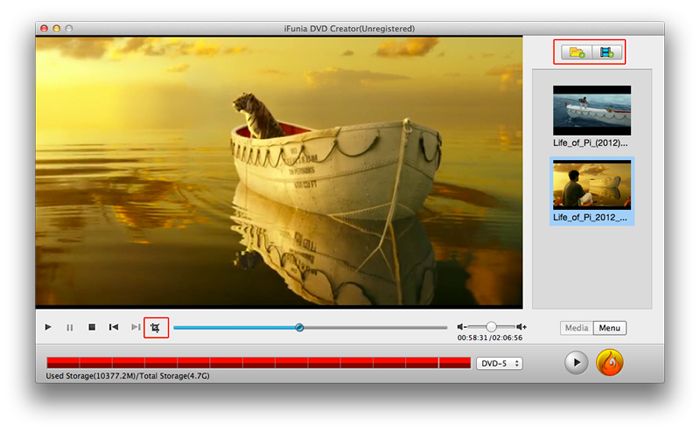 Step 2. Edit the video files (Optional) Step 2. Edit the video files (Optional)DVD Creator for Mac includes all common video editing tools to help you touch up your videos easily. For example, you can trim, crop, rotate, add watermarks, adjust video effects, etc. to bring your video better to watch on TV. Just iDVD Alternative: Create DVD without iDVD on Mac OS X Mounta highlight a video and click Edit to pop up these editing tools for uses. After you do some editing jobs, you can view the effect in the right preview window in real time. Here you can also add different language subtitle files to your DVD movie and optionally adjusting audio volume of the output video. 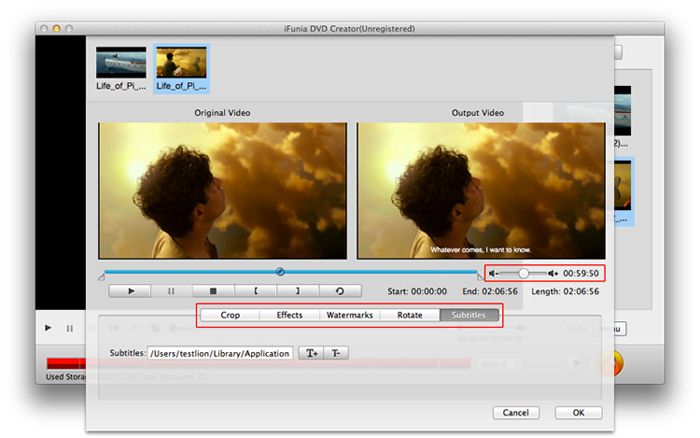 Step 3. Choose a DVD menu Step 3. Choose a DVD menuDozens of DVD menu templates are provided for you to design an impressive DVD menu easily. To get started, just click Menu button and choose a DVD menu template that fits your DVD movie theme, and then personalize it with your background music, frames, button, etc. No menu is also supported. 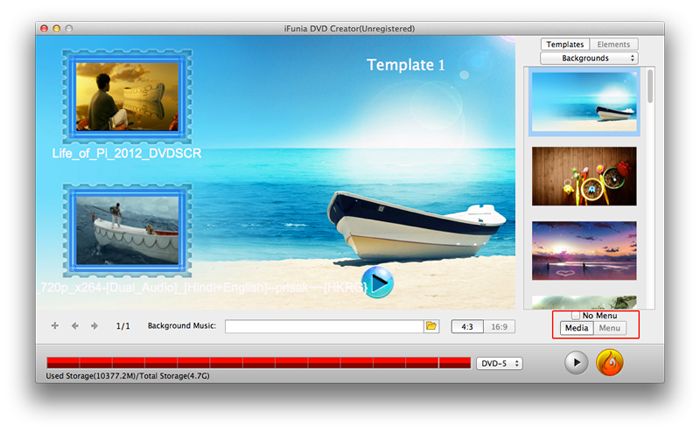 Step 4. Burn DVD with iDVD alternative on Mountain Lion Step 4. Burn DVD with iDVD alternative on Mountain LionBefore burning, youd better preview your DVD project. Click the play button in the tool bar, and a standalone preview window will open. There you can have a look your entire DVD movie in real-time. Turn back to make changes it whenever you want. 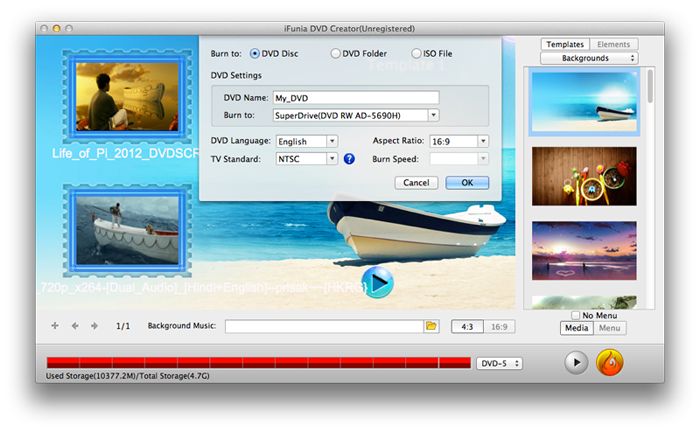 Lastly, click the Burn button at bottom to choose the output file format and location. Dont forget to give a name to your DVD movie which will display when you insert DVD disc to DVD drive. As you can see, you can also save files as DVD folder, DVD, or ISO file for burning later. Related posts:Handbrake Alternative for iPad on Mac OS X 10.8 Mountain LionOS X 10.8 Mountain Lion Minimum System RequirementsHow to Create an ISO Disc Image on Mac OS XRip DVD to Apple TV 3 1080p Video on OS X Mountain Lion
Wed 17 Apr 2013, 10:24
|
Reader Louis would like to burn his camcorders content to DVD in full HD 1080p. He writes: I have a Sony AVCHD camcorder that I dont always keep at home. I was wondering if there was a way for me to burn it in Full HD (1920 X 1080) so that I can play the results on a DVD player? There is. And walk through below detailed guide. AVCHD is a high-definition video format, widely used on higher-end consumer digital camcorders. When youd like to convert AVCHD(MTS.M2TS) videos to DVD and watch it on your HD television (HD TV) or on your computer, you may need a DVD burner to burn AVCHD to DVD. 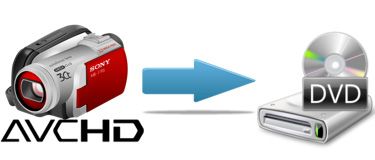 As we know, iDVD only supports common videos like MOV, MPEG-4, H.264, MPEG, M4V, 3GP. For HD video, such as AVCHD, MTS, M2TS, TS, TP, TRP, iDVD couldnt handle well. To do this job, we at iFunia naturally recommend DVD Creator for Mac (Mountain Lion supported). With this DVD maker, you can easily burn all popular videos to DVD with excellent quality. Whats more, the embedded editing functions and free menu templates can help to touch up your video DVD instantly. Free Download DVD Creator for Mac and install it. To install it, simply mount the .dmg archive by double-clicking it, and copy the application to your applications folder (or wherever you want). Step 1. Import AVCHD Video ClipsDownload and run iFunia DVD Creator for Mac, load your AVCHD videos into the program by drag&drop. When complete, preview the videos in the left Previewing window. On the right source window, you are free to organize the videos order. AVCHD records video at a range of resolutions including 1080p, 1080i and 720p. When burning AVCHD to DVD, select High Quality in the burning parameters to ensure the video quality. 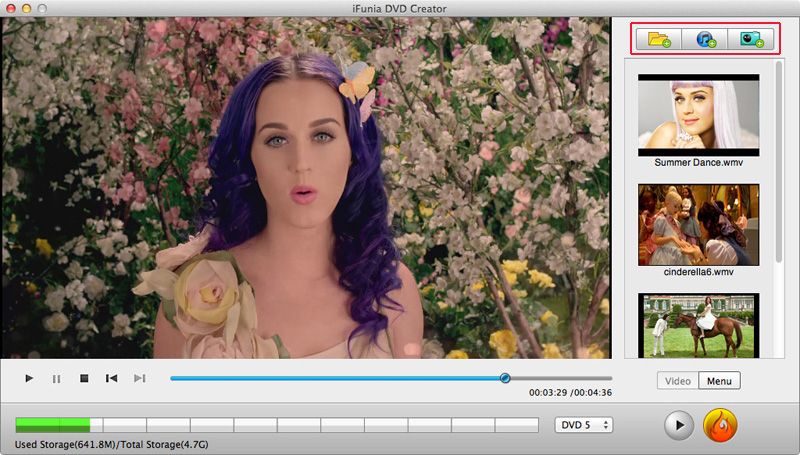 Step 2. Trim, Crop and De-interlace Your AVCHD MTS/M2TS files. Step 2. Trim, Crop and De-interlace Your AVCHD MTS/M2TS files.Editing functions are available in iFunia DVD Creator for Mac. Double click the video youd like to edit and decorate your videos by crop, trim, de-interlace and adjust the effect of the videos. You can add watermarks to illustrate the scenes or give the video a background music you like. 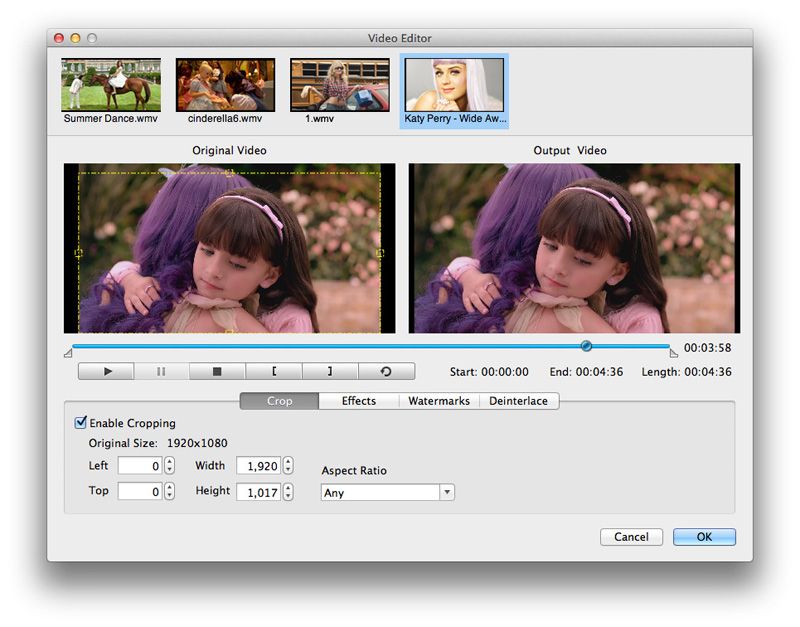 Step 3. Select a DVD Menu Step 3. Select a DVD MenuClick the Menu button on the lower right bottom of the main interface to enter the menu editing window. Rich variety of stylish free DVD menu templates are provided. Choose a suitable menu style for your DVD, and then customize it according to your needs. In the Menu page, you can freely add text and change the frame and button of the menu. You can also Click background music to add music from local files. 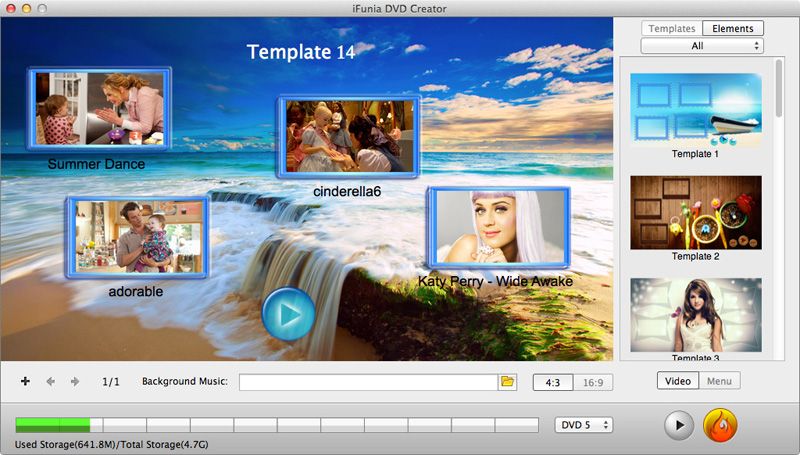 Step 4. Start AVCHD Burning Step 4. Start AVCHD BurningNow you can preview your entire DVD movie project to ensure everything is perfect. After all necessary settings, you need to insert a blank or re-writable disc to your Mac if you want to burn video files on DVD disc. Or you can simply convert the videos to DVD folder or ISO file on your Mac for later burning. 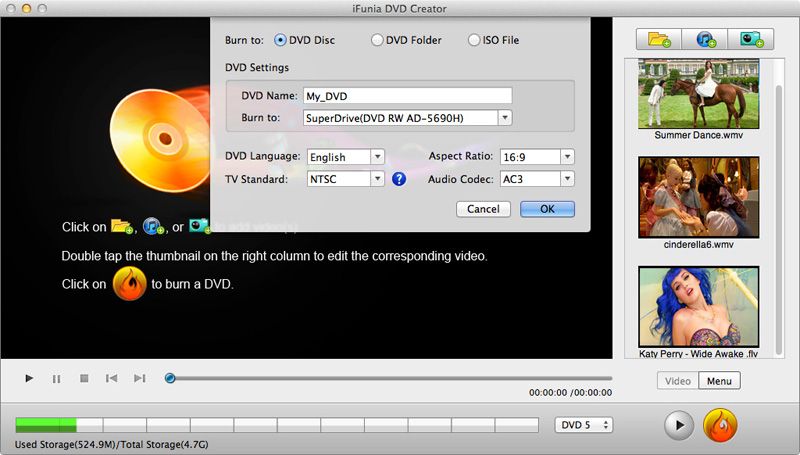 That is it! With just a few clicks, you can create DVD from AVCHD files with gorgeous DVD menus and eye-catching video effects. Just enjoy the AVCHD videos and movies on your big TV screen! Watch the step-by-step video tutorial below: http://www.youtube.com/watch?feature=playe...p;v=MledA_u9BIA
Wed 27 Mar 2013, 09:34
|
Samsung has added to its ever-growing Galaxy portfolio of devices with a new tablet, the Note 8.0. With this new Note, the companys culled the best of whats around its Galaxy into an 8-inch form factor, housing a 1,280 x 800 TFT display, Exynos 4 Quad with 2GB RAM (clocked at 1.6GHz), TouchWiz-skinned Android Jelly Bean 4.1.2 OS, S Pen (and suite of associated apps), as well as radios for HSPA+ and WiFi into that familiar, lightweight plastic body. Samsung says it was designed to be like a personal notebook or diary and that it is the perfect size for you to take anywhere and watch videos, with WIFI and built-in YouTube player equipped, streaming online YouTube videos may ranks as your first option since YouTube holds the most of worldwide video clips, films, episodes for sharing. But viewing YouTube videos online with web connection may be troublesome when taking the unstable internet connectivity into account. In fact, a very effective way is to download YouTube video to Galaxy Note 8.0 with the help of a YouTube downloader for Galaxy Note 8.0. If you want to download and play YouTube videos on Galaxy Note 8.0, iFunia YouTube Converter for Mac is the all in one YouTube downloader and converter for you to download YouTube videos directly to your Mac drive, and convert your YouTube FLV files to Galaxy Note 8.0 supported format. This article will show you how to download and play YouTube on Galaxy Note 8.0 step by step. Download Free Trial of iFunia YouTube Converter for Mac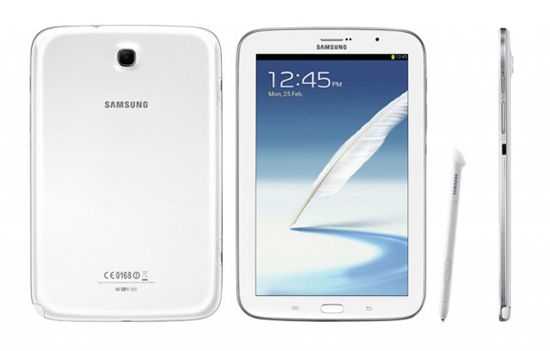 Step 1. Free Download YouTube Video for Galaxy Note 8.0 Step 1. Free Download YouTube Video for Galaxy Note 8.0Browse youtube.com and open the YouTube videos you are going to download. Copy the URL of each video. Click Add URL button to add YouTube video URLs then click OK to start downloading videos from YouTube to Samsung Galaxy Note 8.0. After the URLs have been added, click Download button and start your magic YouTube downloading now. 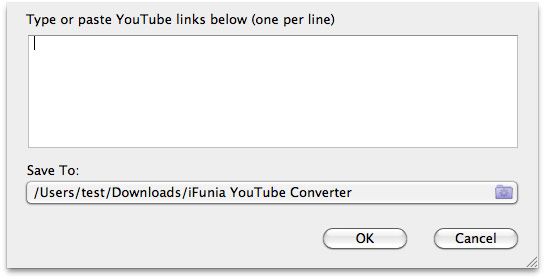 Step 2. Convert YouTube to Galaxy Note 8.0-ready Format Step 2. Convert YouTube to Galaxy Note 8.0-ready FormatA) Output format- After the download is complete; you can now convert them to the formats compatible with Samsung Galaxy Note 8.0. Click the gear-like icon to reach the output setting window and then click the Convert to column to select MP4 format as output format from the General Video format drop-down list. And you can set different formats for different files. 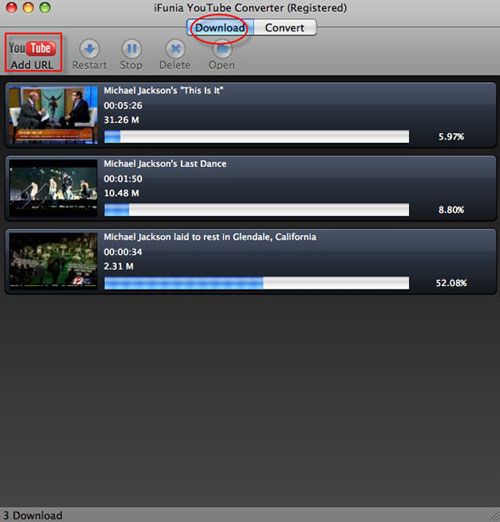 Samsung Galaxy Note 8.0 Supported Video&Audio Format. Samsung Galaxy Note 8.0 Supported Video&Audio Format.★Supported video format: H.263 / H.264 / MPEG4 / 3GP/ WMV / DivX / Xvid / ASF ★Supported audio format: MP3 / AAC/ ACC+ / e-AAC+ / WMA / WAV / AMR / FLAC / OGG B) Output folder- Set destination or leave it to be defaulted, and click Convert icon to start converting YouTube videos to Samsung Galaxy Note 8.0 on Mac. Step 3. Transfer YouTube Video to Samsung Galaxy Note 8.0When the conversion is done you can transfer the output videos to your Samsung Galaxy Note 8.0 on Mac. In a word, YouTube Converter is an all-in-one app, which features as a professional online video downloader and a powerful FLV video converter. It enables you to download videos from YouTube as well as convert the downloaded videos to almost all popular video formats.
Wed 30 Jan 2013, 02:17
|
Have you got a collection of videos up on YouTube which gone missing from your local backups? Now you can grab the originals from Google Takeout. It is now offering the ability to download the original versions of your videos i.e the format in which they were uploaded on YouTube. The Data Liberation Front has added the ability for users to download the videos theyve uploaded to YouTube back down in their original format: your videos in. your videos out. How To Download YouTube Videos In Original Format Using Google Takeout
Step 1: Go to Google Takeout, Click on Create Archive button. Google will start creating an archives files of all video which you have uploaded in YouTube. Building an archive file may take some time, depending on the file size and number of videos. 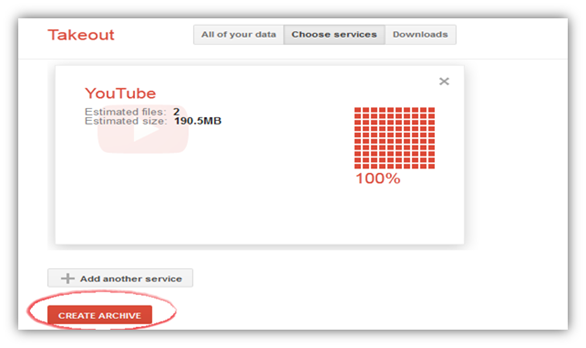 Step 2: Step 2: Once the archive is complete showing 100% status, you can proceed to download by clicking on Download button. In case the file size is greater than 2GB then Google Takeout will split them into the individual file of 2GB each. 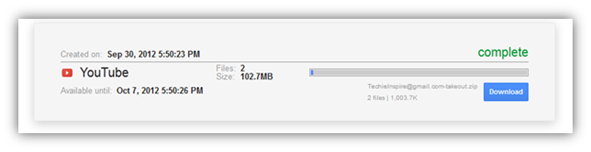 Drawback: Drawback: Google Takeout doesnt provide any option to choose individual videos from YouTube. Download Other Videos From YouTube Using iFunia YouTube DownloaderThis update does not allow you to download just any video you find on YouTube thats not the situation in the least. Instead its an expansion of your ability to keep your own videos that you yourself uploaded. If you want to download other videos from YouTube, iFunia Free YouTube Downloader is the all in one YouTube downloader for you to download YouTube videos directly to your Mac drive. If you are using Windows, please go to iFunia Free YouTube Downloader for Windows.  Instructions Instructions1. Download Free YouTube Downloader for Mac, then install and launch the program. 2. Open your web browser, go to you and search the video clips youd like to download. 3. Drag and drop the URL of YouTube videos to the interface of the YouTube Downloader and the videos will start downloading automatically.
Mon 28 Jan 2013, 08:53
|
As PDF files widely used on virtually any platform, including Windows®, Unix, Mac OS X, and mobile platforms, more and more people use PDF format to store their e-books, projects, assignments, product descriptions and teaching materials etc., which makes PDF format becomes one of the most popular digital document formats for transmitting messages, either through the Internet or Email.  Despite the ever-increasing availability of high-bandwidth Internet connections, file size still matters when youre sending e-mail attachments or when you have recipients downloading your files over slow connections. Under this condition, we may always need to compress a PDF file for the purpose of emailing as attachments or sharing via the web. Below are some PDF compression tips on how to make your PDF smaller on Mac. Method 1: Compress PDF on Mac with Preview:Compressing a PDF on Mac is very easy with the Macs built-in Preview app, heres the real process: 1. Open the PDF file with Preview application. 2. Choose File >> Save As. 3. In Quartz Filter, select Reduce File Size >>Save. Method 2: Reduce PDF File Size with PDF Compressor for MacPDF Compressor for Mac compresses and reduces PDF file size by optimizing the resolution and compression method of images, removing unused thumbnails and metadata, stripping dead-object and compressing other parts of PDF files. Supports drag-n-drop to batch compress multiple PDFs instantly at a time. Just drag and drop the PDF to its interface and then click the gear-like icon to select a compression option. If the source PDF file is protected by user password, you may need to enter the password before you can compress it. 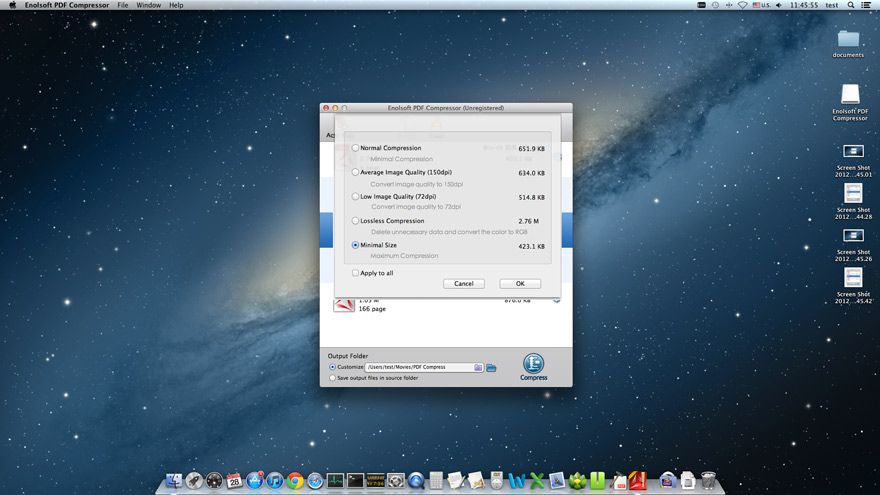 Method 3: Shrink Your PDF with Acrobats PDF Optimizer Method 3: Shrink Your PDF with Acrobats PDF OptimizerPDF Optimizer provides many settings for reducing the size of PDF files. Some of the PDF Optimizer settings are comparable to the settings that are available when you create a PDF file using Distiller. Whether you use all of these settings or only a few depends on how you intend to use the files and on the essential properties a file must have. In most cases, the default settings are appropriate for maximum efficiencysaving space by removing embedded fonts, compressing images, and removing items from the file that are no longer needed. Before you optimize a file, its a good idea to audit the files space usage. The space audit results may give you ideas about where best to reduce file size. You can also reduce the size of your PDF by using the Reduce File Size command. To open the PDF Optimizer dialog box, do one of the following: 1. In a single PDF, choose File > Save As > Optimized PDF. 2. When editing an Action Wizard, click Save To options. Then in the Output Options dialog box, select PDF Optimizer, and click Settings. 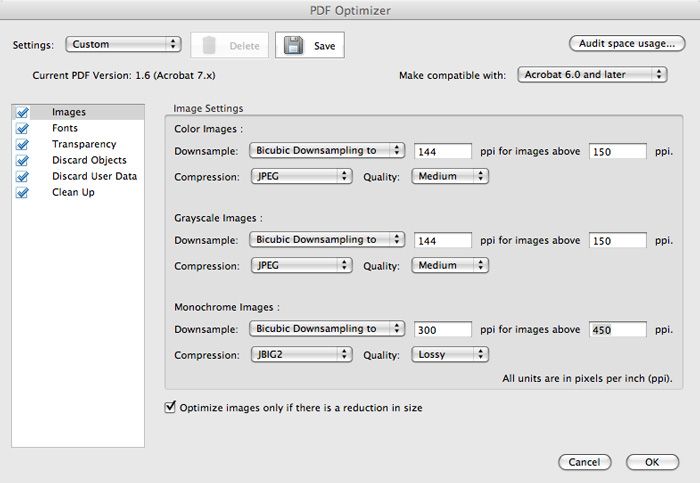 How you go about reduce your PDFs depends largely on how much you want to spend on the PDF compressing tools, and how much control you want to exert over the process. If dealing with PDFs is only an occasional experience for you and you dont care about the image quality in PDF files, Macs Preview utility may offer all the compression capabilities you need. For more control, a utility like Enolsofts $29 PDF Compressor provides additional capabilities without breaking the bank. And if creating reasonably sized PDF files for public distribution is core to big business, you need Adobes $449 Acrobat Pro.
Fri 28 Dec 2012, 04:10
|
The weekend is right around the corner, and now that school is off, what better time to catch up on all of our favorite Christmas movies? Like tons of other people, maybe youre getting more and more videos and movies from torrent downloads and want to burn downloaded torrent movies to DVD or enjoy the videos on your DVD player. In this article, you will learn how to download torrent files and burn downloaded torrent movies to DVD on Mac with iFunia DVD Creator for Mac. Free Download DVD Creator for Mac and Install ItPart 1. How to Free Download Torrent Files?Downloading with a torrent is actually very simple. You just need a rightly set torrent client (setting your connection speed is usually all you need to set). Then you open the torrent file inside your client, set a place where you want to download desired files and then just wait till its downloaded. If you dont know how to download torrent movies on Mac, check out here first. Part 2. How to Burn Torrent Videos to DVD Step By StepAfter downloaded movies with bittorrent client, free download and install torrent to DVD Converter for Mac first. With this professional DVD Creator for Mac, you can burn the downloaded torrent movies to DVDs whenever you like on the Mac (Mountain Lion included). It is an app which was specially designed to burn almost all kinds of videos (HD videos & Standard videos) to DVD disc, ISO file, and DVD folder. So you can enjoy these movies as if they are DVD movies. Here is how to operate the app. Step 1. Load torrent moviesTo get started, load your downloaded torrent video files into the program by drag&drop. The imported videos will be displayed in thumbnail at the file list. Simply drag and drop to change video order. All popular torrent video formats are supported, including AVI, MKV, RMVB, MOV, RM, VOB, MP4, WMV, MOD, TOD, and more.  Step 2. Edit torrent videos Step 2. Edit torrent videosOn the right panel of DVD Creator for Mac, double click a video you need to open the video editing window. You can crop, rotate, trim videos, etc. as you like and add watermarks and set some special video effects to make them look greater! 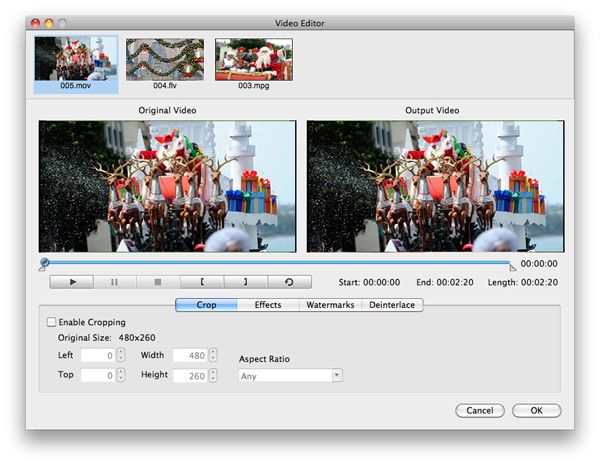 Step 3. Select a DVD menu Step 3. Select a DVD menuClick the Menu button on the lower right bottom of the main interface to enter the menu editing window. Rich variety of stylish free DVD menu templates are provided. Choose a suitable menu style for your DVD, and then customize it according to your needs. In the Menu page, you can freely add text and change the frame and button of the menu. You can also Click background music to add music from local files.  Step 4. Start torrent movies to DVD burning Step 4. Start torrent movies to DVD burningAfter all the settings, preview the DVD project, when you are happy with the result, Click the Burn button to step into the video burning part. in which you can choose the TV standard, burn to DVD Disk, DVD Folder or ISO File, output destination, etc. The burning time mainly depends on the videos size and your computer performance. When the burning process complete, enjoy the downloaded torrent movies on your DVD player with ease! 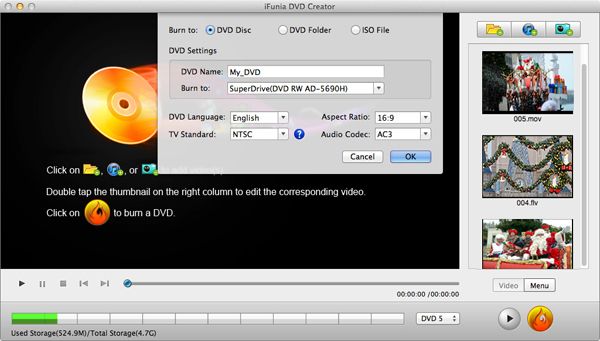
Mon 17 Dec 2012, 07:52
|
Everyone loves receiving Christmas gifts. Christmas home made DVDs help us keep family and friends close to our heart during the holidays. This year why not make your own Christmas DVDs for an extra-special touch? Even just adding little Christmas party details family get together videos, Christmas carols sung by family member will go a long way. In this article, well show you how to make a Christmas DVD that will be cherished by all who receive them. Best Christmas Video to DVD BurneriFunia DVD Creator for Mac is the best answer to make a Christmas DVD on Mac. Apart from its up to 15x video converting speed and simple editing functions, it is also a professional DVD burning and creating solution which comes with various DVD templates. In the following guide, we will detail you how to make a Christmas DVD with iFunia DVD Creator for Mac. Free Download DVD Creator for Mac and install itHow to Burn Christmas Home Video to DVD Step By StepStep 1. Transfer Christmas videos to computerDownload and install DVD Creator for Mac, after that you can load your Christmas home video files into the program by drag&drop. The loaded files will be shown in thumbnail at the file list. You can rearrange them by dragging and dropping the thumbnail freely according to your preference. 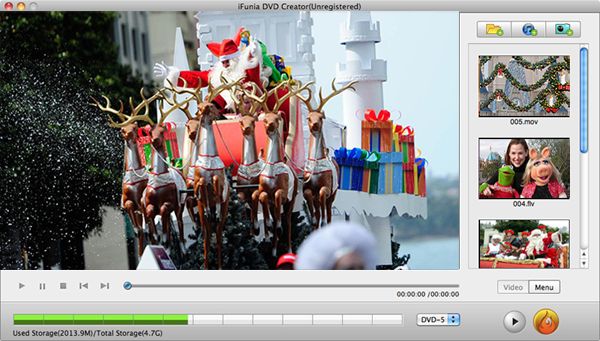 Note Note: This Mac DVD Creator supports almost all types of video, be it downloaded from the Internet, recorded from camcorders, or created by iPod Touch and iPhone 5. Step 2. Edit the Christmas home videosOn the right panel of DVD Creator for Mac, double click a video you need to open the video editing window. You can crop, rotate, trim videos, etc. as you like and add watermarks and set some special video effects to make them look greater!  Step 3. Select a Christmas DVD menu Step 3. Select a Christmas DVD menuClick the Menu button on the lower right bottom of the main interface to enter the menu editing window. There are many free Christmas DVD menu template for your choices. Just find the one you like. You can also customize the DVD menu frames, buttons, and title names, etc. with your favorite ones to make the DVD menu more personalized. You can even choose a song to accompany the displayed menu. 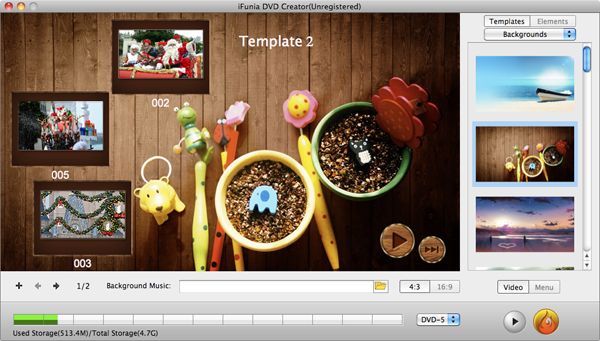 Step 4. Preview and burn Christmas home videos to DVD Step 4. Preview and burn Christmas home videos to DVDBefore burning, youd better preview your DVD project. Click the play button in the tool bar, and a standalone preview window will open. There you can have a look at your entire DVD movie in real-time. Turn back to make changes whenever you want.  When settings are complete, click the Burn button at bottom to continue. DVD Creator has 3 output options: DVD Disc, ISO file and DVD Folder. Make settings (e.g. Output destination and TV standard) in the resulting dialog and click OK to start burning your Christmas video files to DVD. After a while, youll get prompted when DVD burning is complete.
Wed 9 May 2012, 08:10
|
Get Aneesoft 3D Flash Gallery to make yourself family photo gallery as Mother's Day gift.Looking for Mother's Day gift ideas? You've come the right place! Here we've got unique recommendation for Mother's Day gifts. This article is to help you make family photo gallery to celebrate Mother's Day. To make a perfect Family Photo Gallery, choosing a good tool is very important. Use Flash Gallery Maker, then you can get it done easily saving lots of time and energy. Aneesoft 3D Flash Gallery helps you to make the best Family Photo Gallery. Here is a family photo gallery sample I made with this flash gallery making software. Here is the step by step tutorial on how to a make Family Photo Gallery.Preparation of making family photo gallery Download Aneesoft 3D Flash GalleryAbundant family photos Step 1: Launch the tool and Add photos  Click Add Photo button to import family photos from your computer. *.png, *.gif, *.jpg, *.jpeg, *.bmp, *.emf, *.wmf formats are all supported. After loading, you can also arrange the pictures order freely and edit it you want to, such as crop, add effect, rotate, add text/caption and more. Step 2: Choose your desired template from 35+ templates and add background music  Press Template tab and choose from three different categories templates including different style templates. You can customize the settings of the photo flash gallery- background, thumbnail effect, scrolling action, playback option etc. Also you can hit Add Music to add background music and trim it, fade in or fade out the song and more. Step 3: Publish your family photo gallery  After all settings, hit Publish tab to choose an output way-SWF, EXE, Email, HTML, SCR. Of course you can adjust the output size, image quality, output path, file name.
Wed 9 May 2012, 08:10
|
Here tell you how to play 1080i AVCHD videos on iPad 3 from 1080i HD camcorder Q: I have recorded some wonderful moments with my 1080i HD camcorder Panasonic HDC-SD80 at my vacation recently and I wanna put these recorded 1080i hd videos on my new iPad 3, so that I can recall the memories and share it with my colleagues in the office. But, my new iPad cannot play these camcorder videos. How to figure it out? Videos recorded by Panasonic HDC-SD80 are in the form of AVCHD at 1080 / 60i, 540 / 30p. The new iPad cannot directly play these 1080i HD video. But we can use Aneesoft iPad Video Converter for Mac to convert 1080i AVCHD videos to iPad 3 compatible videos for playback. Below are the simple steps to play 1080i AVCHD videos on new iPad 3. Download Aneesoft iPad Video Converter, install it on your Mac. Step 1.Click the Add Files button to load 1080i AVCHD videos to Aneesoft iPad Video Converter for Mac.  Step 2 Step 2.Click the Output Format option and choose iPad(1080p) H.264 Video(*.mp4), the converter will convert 1080i AVCHD videos to 1080p MP4 videos for iPad. Step 3.Click the Start button, then the conversions from AVCHD to MP4 for iPad starts immediately. When the conversions are finished, connect iPad to iMac/MacBook Pro. Sync 1080p MP4 videos to iPad via iTunes, and then you can share the camera videos on iPad. Tips: The term 1080i assumes a display aspect ratio of 16:9 (widescreen), implying a frame resolution of 1920 pixels wide by 1080 pixels high (1920×1080). Theistands forinterlaced scan. 1080i each frame of video is sent or displayed in alternative fields. The fields in 1080i are composed of 540 rows of pixels or lines of pixels running from the top to the bottom of the screen, with the odd fields displayed first and the even fields displayed second. Together, both fields create a full frame, made up of all 1,080 pixel rows or lines, every 30th of a second.
Thu 19 Apr 2012, 08:35
|
 YouTube added an experimental beta feature to its creator tools 3D conversion. With this tool, any video creator could easily convert a video to 3D format with one click. This feature has been expanded to include users, who can now convert certain 1080p videos into 3D whenever they wish. When you find a compatible YouTube video and own a special glasses for 3D movies view, all you have to do is to click the 3D button next to the gear, or in some cases, click the gear itself and choose 3D from the quality options. This will automatically convert the video into 3D format. If we want to free download the 3D video to your computer, then how can we do? To free download YouTube 3D videos in an easy way, someone may consider installing an add-on YouTube Video downloader app on the browser, which supports to free download YouTube 3D videos to play locally on your computer. But the add-on app will slow down your web. If you don't want to slow down your brower with add-ons, you may download the stand-alone and free YouTube Downloader. Aneesoft Free YouTube Downloader allows you to free download YouTube 3D videos in FLV, MP4, WEBM, F4V
formats on Windows PC. Its usable on Windows XP (SP2 or later), Windows Vista, Windows 7. Setting video quality is offered, such as HD 1080P, HD 720P, High Definition, Medium Definition etc. Following is the details on how to free download 3D videos from YouTube 3D Channel with Aneesoft Free YouTube Downloader. Steps: How to Free Download YouTube 3D Videos/MoviesStep 1. Free download, install and open Aneesoft Free YouTube Downloader on your computer, then click the button Online Files.  Step 2 Step 2. Click Add to paste the URL of the online 3D video and click OK to import the videos into the download list.  Step 3(Optional) Step 3(Optional), You can adjust output format, quality, file name, path by clicking the bar of Format, Quality, Save Name, Save Path.  Step 4.Click Download to start downloading all 3D videos. Step 4.Click Download to start downloading all 3D videos.As you see, it is so easy to free download YouTube 3D videos on PC! Furthermore, if you want to free download YouTube 3D videos on Mac, you can download Aneesoft Free YouTube Downloader for Mac to have a try!
| |


 Idvd Alternative: Create Dvd Without Idvd On Mac Os X Mountain Lion